Enabling Touch Responsiveness: Difference between revisions
(Added the "Adding a Directional Light" section) |
(Added the occlusion map section) |
||
| Line 11: | Line 11: | ||
=== Step 3: Confirm that the light is working by enabling "Show Contact Zones". If the lighting is not correct, a checkboard pattern will appear: === | === Step 3: Confirm that the light is working by enabling "Show Contact Zones". If the lighting is not correct, a checkboard pattern will appear: === | ||
[[File:Touch Response - Error.png|none|thumb|600x600px|The checkerboard error pattern]] | [[File:Touch Response - Error.png|none|thumb|600x600px|The checkerboard error pattern]] | ||
== Preventing Self-Triggering == | |||
The touch-response works by using the camera depth-texture to detect nearby objects. Unfortunately, this means the body will self-trigger in crevasses. The "Show Contact Zones" blue areas indicate where this self-triggering is occurring: | |||
[[File:Touch Response - No occlusion map.png|none|thumb|600x600px|No occlusion map]] | |||
This problem can be reduced by adding an "Occlusion Map" that has been baked in Blender to your avatar. The sensitivity level can then be adjusted so that crevasses are excluded (indicated by the red areas): | |||
[[File:Touch Response - Occlusion map.png|none|thumb|600x600px|Using an occlusion map]] | |||
'''Note: in the future, this feature will be moved to a separate mask, which will be directly editable using the Fur Grooming.''' | |||
Revision as of 07:06, 23 July 2023
The touch-responsiveness requires that Unity generate a camera-depth texture, which is dependant on the world's lighting. In worlds that do not have the correct lighting, you can add one to your avatar (note that this will automatically make your avatar rating "Poor").
Adding a Directional Light to your Avatar
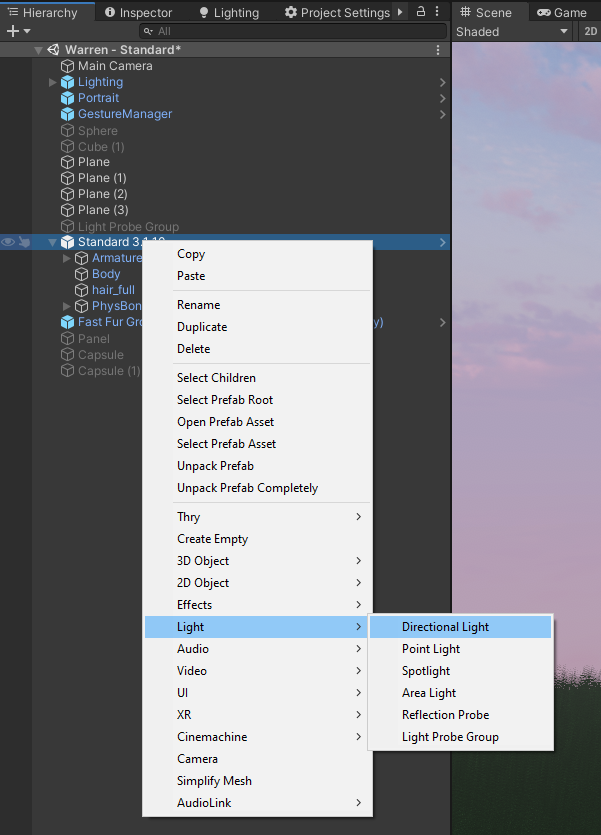
Step 1: Left-click on your avatar, and select "Light -> Directional Light" to add a new light:
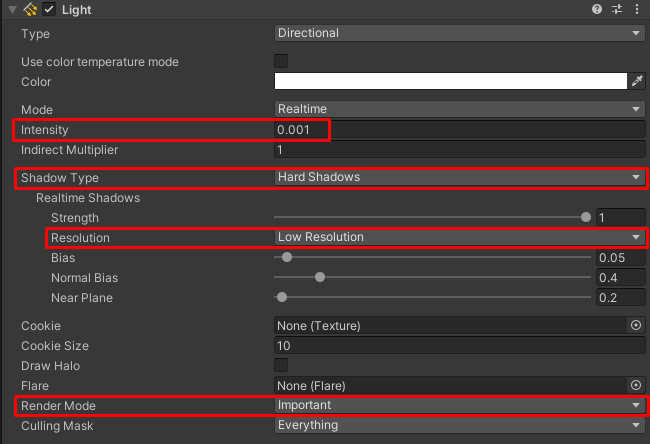
Step 2: Select the newly created light, and change the following 4 settings:
Step 3: Confirm that the light is working by enabling "Show Contact Zones". If the lighting is not correct, a checkboard pattern will appear:
Preventing Self-Triggering
The touch-response works by using the camera depth-texture to detect nearby objects. Unfortunately, this means the body will self-trigger in crevasses. The "Show Contact Zones" blue areas indicate where this self-triggering is occurring:
This problem can be reduced by adding an "Occlusion Map" that has been baked in Blender to your avatar. The sensitivity level can then be adjusted so that crevasses are excluded (indicated by the red areas):
Note: in the future, this feature will be moved to a separate mask, which will be directly editable using the Fur Grooming.


