Fur Thickness and Overall Shape: Difference between revisions
| Line 3: | Line 3: | ||
== Fur Shape Data Map == | == Fur Shape Data Map == | ||
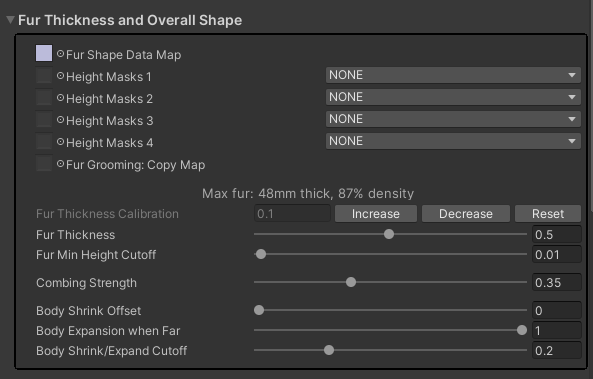
The Fur Shape Data Map contains the grooming data for the fur. | The Fur Shape Data Map contains the grooming data for the fur. The channels are encoded as follows: | ||
* Red - Combing direction X (0 = left, 0.5 = centre, 1 = right) | * Red - Combing direction X (0 = left, 0.5 = centre, 1 = right) | ||
| Line 12: | Line 12: | ||
The shader package includes a Fur Grooming tool for editing the Fur Shape Data Map. | The shader package includes a Fur Grooming tool for editing the Fur Shape Data Map. | ||
Advanced users may wish to edit the Fur Shape Data Map, using other tools. If so, then be aware that a "blank" texture should have the Red, Green, and Alpha channels set to 0.5. | Advanced users may wish to edit the Fur Shape Data Map directly, using other tools, such as Photoshop or GIMP. If so, then be aware that a "blank" texture should have the Red, Green, and Alpha channels set to 0.5, not 0. Also, it is worth noting that the Red/Green combing direction is the same encoding used by Normal Maps. | ||
== Height Masks == | === Height Masks === | ||
Height Masks are typically used to trim the fur when clothing is being worn. All 4 channels (ie. Red, Green, Blue, and Alpha) of all 4 Height Masks are all treated the same as the Fur Shape Data Map fur thickness channel (ie. Blue). The shader will use the lowest (ie. shortest) value out of all the channels that are active. | |||
For example, on my avatar, I have chosen to use Height Mask 1 for shirts, and Height Mask 2 for pants. I then use the Red channels for large items of clothing, Green for medium, and Blue for small. You don't need to follow my example, you are free to organize the masks however you wish. | |||
So, to trim my fur when I am wearing large pants and a large shirt, I use an Animation to turn on the red channels of my Height Masks: | |||
[[File:Fur Mask Example - Large Masks.png|none|thumb|645x645px|My large shirt and large pants height masks.]] | |||
Height Mask channels are typically made by copying the Blue channel from a Fur Shape Data Map to one of the channels of the Height Map. | |||
== Fur Thickness == | == Fur Thickness == | ||
Revision as of 18:11, 25 September 2023
Fur Thickness and Overall Shape
Fur Shape Data Map
The Fur Shape Data Map contains the grooming data for the fur. The channels are encoded as follows:
- Red - Combing direction X (0 = left, 0.5 = centre, 1 = right)
- Green - Combing direction Y (0 = down, 0.5 = centre, 1 = up)
- Blue - Fur thickness (0 = no fur, 1 = maximum thickness)
- Alpha - Hair density (0 = 1% density, 0.5 = 100% density, 1 = 10,000% density)
The shader package includes a Fur Grooming tool for editing the Fur Shape Data Map.
Advanced users may wish to edit the Fur Shape Data Map directly, using other tools, such as Photoshop or GIMP. If so, then be aware that a "blank" texture should have the Red, Green, and Alpha channels set to 0.5, not 0. Also, it is worth noting that the Red/Green combing direction is the same encoding used by Normal Maps.
Height Masks
Height Masks are typically used to trim the fur when clothing is being worn. All 4 channels (ie. Red, Green, Blue, and Alpha) of all 4 Height Masks are all treated the same as the Fur Shape Data Map fur thickness channel (ie. Blue). The shader will use the lowest (ie. shortest) value out of all the channels that are active.
For example, on my avatar, I have chosen to use Height Mask 1 for shirts, and Height Mask 2 for pants. I then use the Red channels for large items of clothing, Green for medium, and Blue for small. You don't need to follow my example, you are free to organize the masks however you wish.
So, to trim my fur when I am wearing large pants and a large shirt, I use an Animation to turn on the red channels of my Height Masks:
Height Mask channels are typically made by copying the Blue channel from a Fur Shape Data Map to one of the channels of the Height Map.

